
3 Bedroom Ranch Remodel
Home Remodeling Tips: Remodeling Your Ranch Home
Open up cramped spaces by expanding a small kitchen
 Family Handyman
Remodel a small ranch house kitchen by expanding it and removing a wall to the living area, all without losing the original character of the home. Modern touches include custom cabinetry, halogen lighting, a built-in bench, hidden outlets and more.
You might also like: TBD
The Problem: A small, closed-off kitchen
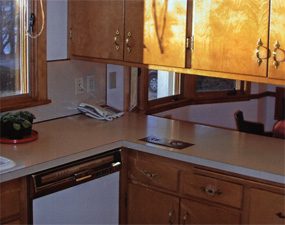
Typical ranch kitchen
Ranch kitchen before remodeling
Looking to simplify their life, Bruce and Mary Jane Pappas decided to trade their 1905 Victorian home for one that demanded less upkeep. They found this late-'50s ranch-style home in a Minneapolis suburb and moved in about 18 years ago.
Ranch-style homes, also known as ramblers in some parts of the country, have many features that attract today's home buyers. They're usually structurally and mechanically sound, and their characteristic low-pitched roof with wide overhangs protects the windows and siding and keeps exterior maintenance to a minimum. The slim ranch-style trim is easy to match or reproduce and goes well with popular modern and retro cabinetry and furnishings.
One drawback, however, is that the small enclosed spaces in the typical ranch floor plan are usually out of step with today's lifestyles, which favor more open space and informality. So when Bruce and Mary Jane decided to remodel the kitchen, their main goal was to rework the floor plan to combine the cooking and socializing areas, and to do this without destroying the features that make their house unique.
Solution 1: Open the kitchen to living area
Rather than thinking about a kitchen remodel as an isolated project, Mary Jane, who owns a design firm, worked out a plan that reconfigured the entry, the living room, the dining room and the kitchen. She decided to remove the wall between the kitchen and living room. This would provide a great view of the wooded backyard through the wall of glass in the living room, and create a wide-open space for family members and guests to chat with the cook without getting underfoot.
With the wall removed, the original doors on each end of the kitchen became extraneous. Mary Jane took advantage of the old doorjamb and trim in the entry to create a unique mirrored boot bench (See "Solution 3" below). On the opposite side of the kitchen, covering the doorway allowed for the conversion of the old dining room into a cozy media niche. This also accomplished a secondary goal of getting the TV out of the living room. Leaving the existing walls in place—with the exception of the new opening into the living room—allowed Pappas to save the original stone entry floor and eliminated the expense and waste of unnecessary tear-out.
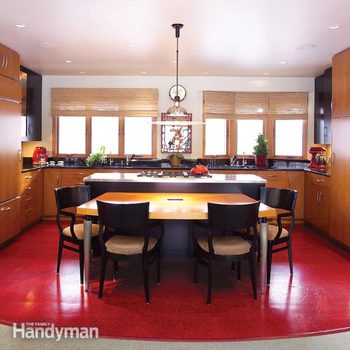
Kitchen After Remodeling
Before remodeling, the kitchen was barely big enough for one cook. With the wall removed and the traffic rerouted, the new configuration has plenty of space for two cooks and guests at the table.
Kitchen Floor Plans
The "Before" and "After" floor plans show how removing a wall allowed for a better use of kitchen space.
Solution 2: Honor the '50s ranch style
When the Pappases moved into their late-'50s ranch-style home, Mary Jane was itching to tear out or paint over the dated golden-birch woodwork. But since she and her husband were both busy with careers, kids and projects in other parts of the house at the time, they put off the remodeling of the kitchen and the surrounding areas until recently.
The delay was serendipitous. The Pappases grew to appreciate the beauty of the old wood. And Mary Jane realized that what she really disliked wasn't the woodwork, but the bland, neutral surfaces around it. So when it came time to remodel, rather than rip out the simple ranch-style moldings and solid tongue-and-groove paneling in the living room, Mary Jane designed their new kitchen to honor the '50s aesthetic.
The contemporary design of the birch cabinet fronts complements the style and color of the original doors and the uncomplicated millwork. The new black-lacquered cabinets at the end of each run of wall cabinets and on the island add a modern flair and help balance the design. The builder saved the original tongue-and-groove wainscoting and moldings from the wall tear-out and wrapped them around the opening into the kitchen, adding to the impression that these rooms were always this way. Even the new kitchen windows are trimmed with the original moldings.
Combining '50s Style With Custom Design
The advantage of custom cabinetry is apparent in this section of the kitchen. The narrow vertical cabinet to the right of the built-in oven and microwave is shallower than the rest of the cabinetry to accommodate the furnace flue that runs behind it. But the super-efficient rollout shelving makes up for the lack of depth. Above the microwave, slanting vertical dividers allow easy access to baking sheets and shallow dishes. Rollout trays, mounted on full-extension slides, let you easily reach the stuff in back, and they're carefully spaced to allow just enough room for standard-size cans and boxes. A spacious appliance garage, accessible from the side, is cleverly hidden behind the blank panel.
Oven: Wolf SO30U/S, subzero.com
Microwave: Wolf MW24, subzero.com
Solution 3: Add custom and modern features
The cork flooring in the kitchen is a throwback to the '50s and '60s. Cork flooring, a sustainable building product, feels soft and warm underfoot, making it a good choice for a kitchen. You do have to exercise caution, however, because standing water can cause the edges to swell. Cork flooring is available in several different grain patterns depending on how it's cut, and you can choose from several stain colors. The burgundy-stained cork tiles in this kitchen were glued down to a smooth underlayment and finished with several coats of water-based floor finish.
Cork floor: Duro-Design Barriga, burgundy, duro-design.com
Wine cooler: Subzero 427, subzero.com
Custom-Fit Boot Bench
Rather than tear out the solid birch doorjamb and casings between the old entry and the kitchen, Mary Jane designed a curved bench to fit the opening and then mounted a custom beveled-glass mirror where the door used to be. The bench and mirror provide a handy place for visitors to remove boots and shoes and spruce up before entering the main living area.
Elegant Angled Rollout
To avoid the expense of rebuilding the original window bay, Mary Jane opted to simply install shorter windows that allowed the countertop to run underneath. However, this left a space between the window and the wall that was too narrow for conventional wall cabinets. The solution was to reduce the depth of the wall cabinets with an angled transition. But rather than let this space go to waste, Mary Jane designed a vertical rollout cabinet with an angled front. It's a great place to store spices and other small containers.
Modern Sink Amenities
This efficient sink puts everything you need within easy reach. First in line is the air switch that operates the garbage disposer. Depressing the button pushes a column of air that activates a switch located under the sink. This setup keeps the switch handy without cluttering the backsplash with another switch. No one will accidentally turn on the disposer thinking it's a light. The pullout faucet spout next to the air switch doubles as a sprayer, leaving space for the soap dispenser and filtered-water faucet on the right.
Faucet: KWC Suprimo, stainless steel finish, kwcamerica.com
Drinking water faucet: Mountain Plumbing MT630, stainless steel finish, mountainplumbing.com
Disposer and air switch: Insinkerator Evolution Excel with SinkTop Switch, insinkerator.com
Neat and Tidy Concealed Wiring
False bottoms in the wall cabinets provide a hidden route for the low voltage puck light wiring. During construction, the electrician left a few feet of precisely positioned low-voltage wire sticking out of the wall. Then the cabinetmaker cut holes for the recessed pucks before hanging the cabinets, allowing the electrician to fish the wires through the cavity to wire the lights.
Similar Projects
Source: https://www.familyhandyman.com/project/home-remodeling-tips-remodeling-your-ranch-home/

0 komentar:
Posting Komentar